Friday, November 30, 2007

Studio is Almost Ready!


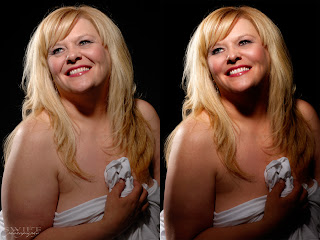
Over the last few weeks I have been converting my detached garage into my studio space. It is 27' wide by 32' deep. I would like a little more depth, but what can you do? I had the heater installed yesterday so now I can begin to paint and get 'er all ready to shoot in. I actually have to squeeze in a maternity session this week before I can start painting and organizing. Once I am up and running I can start doing a bunch of work in the studio to give some information to those looking at studio lighting. I am also trying to learn how to do video tutorials so I can show some of my post processing work, but I haven't found anything online yet to show me how to do it. The above picture shows some of my retouching work (click on it to see it larger).

Thursday, November 29, 2007

Finding Neutral Grey in an Image

As I wait for my studio to get finished (heater is going in as we speak!) so I can start providing some studio lighting information here is a useful little technique to find the neutral grey point in your image.  Create a new blank layer and fill it with 50% grey change the blending mode to 'difference'  Whoa!  Some funky business, eh?  What this basically did was show us where the neutral grey point is.  You see, any color that matches 50% grey (or darn close) will become black.  All the other colors aren't the grey we are after.  Now you need to create a 'threshold' adjustment layer and move the slider all the way to the left--you should see a white screen. This is going to allow us to find that black point in the image that our previous step created.  I like to highlight the number and use my 'up arrow' key to move the slider just until I start to see the first bits of black show up on the screen.  Click OK on that adjustment layer. Zoom into those spots.  Now create a 'curves' or a 'levels' adjustment layer and select the grey eyedropper in the dialogue box.  Place the eyedropper on the black area and then you can click OK on the adjustment layer.  Deleted the 'threshold' and the 'difference' layers and toggle the curves/levels adjustment layer on and off so you can see what you have done.

If your adjustment looks good to your eye then you can merge that layer down or whatever you normally do.  You can also adjust the opacity of the layer to suit.  If there is no truly neutral grey in the image this technique may mess up your colors a little bit or you may just not like the adjustment on this particular image.  If that is the case then you can just delete the adjustment layer and move on.  I am assuming a certain competence with Photoshop here in that you know how to do all of those commands and where to find the respective tools.  If you don't, please shoot me a message and I'll gladly help you out in more detail.

Monday, November 26, 2007

The Land of the Internet

Ah, life on the internet. Loads of valuable information at your fingertips and heaps of bullshit at every turn. I have been a member of a few message boards in my continuing search for good information to take my photography to that ever moving 'next level'. I have noticed that while there are a few very good people on these boards there are a few that, for whatever reason, like to make the experience miserable. These people, hiding behind the anonymity of their computers, love to be rude, uncivil, and even threaten other members. I have found very little useful and consistent information on many of these message boards and you have to weed through the threads of bickering and name calling to find this information. Many of the posters on these sites have no link to their own work and hide behind screen names whilst they sling their mud and 'advice'. The constant bickering over which new camera is the 'best' or which features of a yet to be released camera aren't going to function correctly is emotionally, intellectually draining, and somewhat addictive--much like a soap opera.

In my internet travels I have come across some great websites and they are always a photographer's site. These people offer tutorials and valuable insights into their photography. I will work on putting a list of these sites together so you can browse for great information without all of the grief and drama that message boards seem to be about. I for one will not be participating on message boards any longer. They are, for the most part, counterproductive and a waste of time--time you could be using to read good information, shooting or, in my case, creating a decent source of information for other photographers to learn a thing or two. A blog may not be as 'interactive' as a message board, but at least the information won't be clouded by the incessant bickering and tough-guy attitudes the internet has allowed people to get away with. I don't hide behind a fake screen name and I post my work. You, as the reader of my information, can see my work and take my advice for what you think it is worth. I am a real person, a real photographer, and willing to share my knowledge and opinions freely and honestly with others.
Wednesday, November 21, 2007

A Nifty Little Trick

Want a very fast way to add a bit of snap to your images? Try this: Duplicate your background layer twice. Select the top layer and press 'option+command+tilde' (the squiggle under the escape key). This selects the highlights in the image. Once you have the highlights selected press command+j to put it to a new layer. Change that new layer's blending mode to 'softlight' and POP! Nice, eh? Now, if this warmed up your image too much you can merge that layer down to the second background copy and then change that merged layer's blending mode to 'luminosity' then you can merge that layer down onto your first copied background layer. This is why you duplicate the background twice...to do the luminosity thing if your image gets too warm. This way you get the pop of the effect without the color change. I find that the color boost can help an image in many instances. You can also duplicate that highlight layer a couple times and play with opacities if need be. I use this method all the time to add a bit of snap--quickly. Give it a try and feel free to ask me any questions if you can't figure it out. Oh, sorry PC users, I am not sure what your version of the short cut keys are. I think 'command' is 'ctrl' and 'option' is 'alt'.

Monday, November 19, 2007

Practice, practice, practice!


I often have new photographers asking me how I get my images to look the way they do.  There really are no secrets to what I do although I am sure the people in my Inspiration list have secrets!  When I first picked up a camera I was less than thrilled with the quality of the images.  My first camera was a Nikon D70s.  I snapped away for months and was completely frustrated that my images lacked the sharpness, color, polish, etc. that I saw many other photographers work to possess.  Now, I am talking image quality here and not composition and subject choice which are topics for another discussion.  Why wasn't my work looking like theirs?  We all use the same device don't we?  We can all push a shutter button.  We hear all the time that equipment doesn't matter and I have found that they are right--it doesn't matter (most of the time anyway).

What I have found to be important in getting great image quality is control of the contrast in the situation, control of your exposure, your ability to focus accurately and deliberately, and the work you do (or don't do!) in post processing.  The later of which is very important.  All of these aspects take time to develop a proficiency that will transfer into better quality images.  I'll tell you that I didn't understand that and after a few months of using my D70s and blaming it for the lack of image quality I was getting I went out and  spent a small fortune on the best camera equipment I could buy.  At least now I couldn't blame my gear for my bad images.

While that bought me some peace of mind and tools that I could grow into instead of out of the act didn't do anything to make my work better.  In fact it made it worse for a short time until I learned how to handle the new camera.  I guess what I am saying is there are no secrets to getting good quality images.  You need to practice your techniques and understanding of light and get decent with your post processing skills.  I am still learning and striving for a higher level of image quality and I have a lot yet to learn. If you aren't doing post work on your images then you are losing out big time making them the best they can be.  I can bet you five bucks and a pinch of 'coon shit that many of the images you admire do not come straight out of the camera.  If the photographer tells you that and you believe it then I have a bridge I'd like to sell you--cheap.

Saturday, November 17, 2007

Natural Light

I love using natural light--I use it whenever I can.  I almost always shoot at f2.8 or larger when I am not using strobes as a light source because I am a huge fan of the subject-isolating effects of a shallow depth of field.  The images below were shot with the setup shown and then converted to black and white with a gradient map layer.  I flattened the b&w layer and duplicated it and set the blending mode to 'multiply', added a white mask and then used a circle gradient to reveal the baby.  I adjusted the opacity of the multiply layer to suit my taste.  As always, I retouched the image to remove blemishes, stray hairs, etc.  I recommend you click on the images for a larger view.


Friday, November 16, 2007

New here....

So, I have a few blogs from photographers saved and thought I might try my hand at one. I have no clue what this blog will morph into at this point, but I have a feeling it will mainly focus on providing amateur photographers of women useful tips and techniques in both photography and Photoshop work that I have learned over the last few years. My goal is to help photographers raise the level of their work to well above an average snapshot. I will also probably include the odd rant from time to time or the occasional thought. I welcome comments, questions, and participation so that we may all learn something. I am by no means an expert and I am still learning. I am hoping that what I have learned thus far may help some one get to that 'next level' with their photography. There is more than one way to skin a cat as the saying goes.