Saturday, December 29, 2007

Tinkering Around


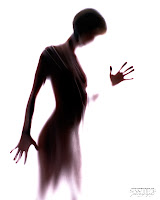
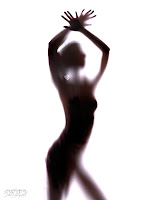
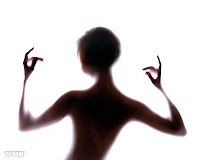
Sometimes playing around just for the sake of it can lead to some interesting images. I shot this lovely young lady over the holidays and it was our second session together. She had originally found me through some headshots I had done for another lady and was interested in trying some nude modeling. Anyway, I was tinkering around towards the end of the shoot to see what would happen if I put a wet sheet in front of the model and strongly backlit her.

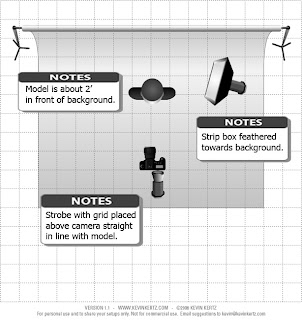
I was very pleased with the results of my little experiment. I didn't meter the lights and set them up by feel. The lights behind her were f16 (set from a previous setup) and the light out front was just there for fun I think. I am not sure it was doing anything other than providing a bit of fill across the front of the sheet. I shot the images at f8 to keep the background pure white. The only image manipulation I did in Photoshop to these was to duplicate the background layer and change the new layer's blending mode to 'multiply' thereby underexposing the image and negating the effect of the front light. I like the look of the darker form behind the sheet. I have included a shot of the actual setup below. Please excuse my studio-in-progress. At least it is boarded and heated now!


Thursday, December 6, 2007

Harsh or Hard?


When I first started in photography I learned that shadows were bad.  People always talked about "filling in shadows" and "watch the harsh shadows".  Shadows are bad they'd say.  So I spent several months avoiding shadows like the plague.  That was a mistake--shadows are great.  You need to learn to understand and control your shadows to create the specific looks you want.  One of the biggest misconceptions I was lead to believe is this term "harsh" to describe shadows that are "hard".  This term, "harsh", has a negative slant to it and I believe is the wrong word to use when describing a shadow that is indeed hard. That term most certainly dissuaded me from using hard shadows and I consequently spent much time agonizing over whether my shadows were soft enough.

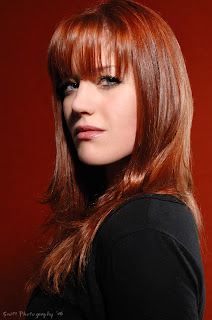
Just what is a hard shadow?  Well, if you are accustomed to using a point & shoot camera with an dinky little on-camera flash you will have no doubt seen hard shadows.  These are shadows which have a clear and defined edge.  That is the transition between the diffused highlight (the properly exposed portion) and the shadow is abrupt and well defined.  The light that creates this type of shadow is often called "harsh" and more often than not used to negatively describe the light quality.  Too many photographers are afraid of hard light, usually characterized by a relatively small light source. Generally hard light is unflattering, but when you use it effectively the images can be fantastic.

The image above is an example of hard light or hard shadow, which ever you prefer.  I purposely chose this style of lighting to bring out her skin and create a matching contrast between the shadows and her black shirt with the lightness of her skin.  The two work to help bring attention to her skin and hair.  I have attached the lighting setup for this particular shot below.  Learn to use your shadows for effect and if you intentionally use a hard light source and some one tells you to "fill in your shadows" or "you should have used a more diffuse light source" you can now stand proud knowing that you chose to use a hard shadow on purpose an it isn't necessarily a bad thing.  And it certainly isn't "harsh" as the word would imply.

Wednesday, December 5, 2007

A Second Look


I have read many times where a photographer indicates that an image has not been cropped or it is straight out of the camera as though these statements are some sort of badge of honour--a feat that makes them somehow better photographers than the rest of us that use some form of post shoot alterations. I am of the opinion that it is the final image that matters. How one arrives at that final images is completely irrelevant. If you can nail a shot in the camera then good for you and I think that is a goal that should always be aimed for, but sometimes better images can be made if you give them a second look on the computer in the peace and quiet of your basement (or where ever your significant other happens to let you set up your machine!).

When I am finished with an image in my RAW converter I bring the image into Photoshop and the first thing I do is crop. I explore different aspect ratios and crop levels to bring out the best in the composition. You would be surprised how a slight crop, tilt or going from a 2:3 ratio to a 3:4 ratio can dramatically improve an image's overall composition. I do this religiously on every image. Some images come in just fine right out of the camera and others need some work. Often you can make several good images from one just by altering the crop.

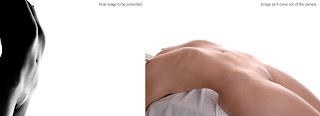
The image shown above was from a shoot that wasn't going terribly well on my end. I accidentally hit the lock on my camera that prevents the focus points from being changed. I didn't realize I had done this and my focus point was stuck on the far bottom right corner when in landscape orientation. I thought my camera was all screwed up, but I figured out shortly after the session that I as a bit of a twit. Anyway, I was very frustrated and my studio wasn't finished as we had just moved in to the place so this was a makeshift shoot at best. The image on the right was as it is straight from the camera. Not too exciting in the least, but I saw a good image hidden within. A little bit of cropping, rotating, recomposing by adding a huge white negative space, converting to black and white, and deepening the shadows completely transformed a shot surely destined for the trash into the image on the left--a keeper for sure.

So don't think that the images you see out there haven't gone through some sort of manipulation to get to the final one you are seeing. Am I less of a photographer for creating the image on the left from the image on the right? I don't think so. If I hadn't shown you what the image really looked like you would never have known. What I find frustrating about this lovely little post work is that when you are trying to figure out how some one lit a particular shot or what have you, the sky is the limit. You could be dealing with something exactly like I am showing you here and you could bang your head against a wall trying to figure out how it was done. Could I have composed and lit that final image in the camera? Of course, but I didn't on this particular day and I created it out of a very bad picture. Nothing wrong with that. In closing I'd just like to tell you to give your images a good looking over after you shoot them--you may find some great images if you aren't afraid to do a little revamping in the computer.